Creating a GameRules Application
Developing new game scripts from the ground up can be an overwhelming task for any artist and developer. Every script should adhere to an established set of development standards to simplify maintenance, customization, and reuse.
Your GameRules application enables you to create new scripts in a few minutes, while ensuring you are following development best practices and standards.
Application Rule
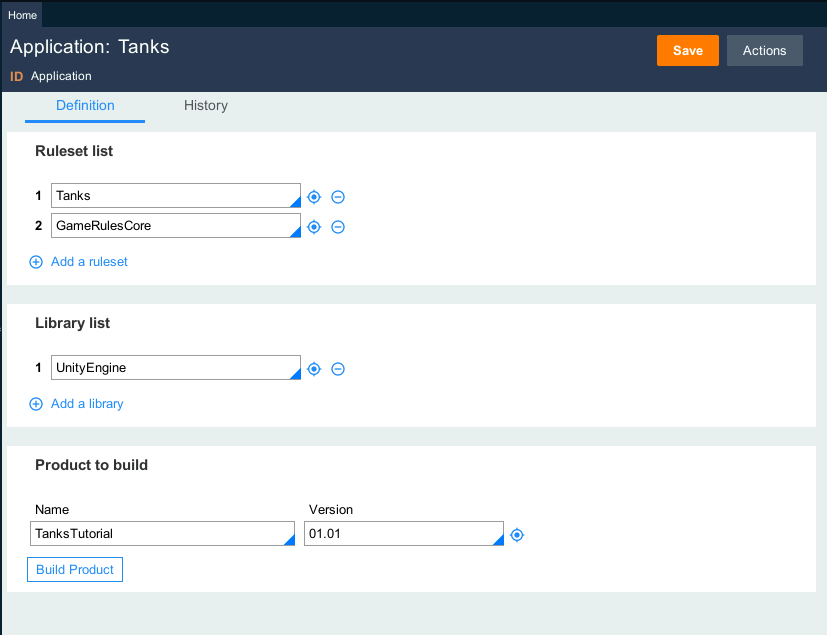
The home tab of GameRules Studio shows you the Application rule.
Note
There is only one application rule in GameRules, and it is always shown in the Home tab.
The Application rule is the master piece of your game:
| Component | Description |
|---|---|
| Ruleset list | Each rule belongs to a ruleset ruleset version. This ruleset list drives both the visibility of the rules for navigation and rule resolution, and also the order list during rule resolution. The rulesets on top have priority on rulesets on bottom. |
| Library list | The library list drives the namespace imports generated for each scripts. It let you automatically add third party libraries and unity namespaces without retyping them each time. |
| Product | The product rule determines the list of flows, state machines and animation flows to build each time the Product Build button is pressed. The product rule defines also the primary class to use for rule assembly. |
Application rule is initialized with GRCore ruleset and a new ruleset with same name defined in Unity under PlayerSettings > Product Name.
Note
GRCore ruleset contains core rules to give you immediate access to functionalities out-of-the-box to accelerate your development. GRCore ruleset should always be included at the bottom of your ruleset list.
Class Structure
A game generally have complex scenes with many objects and components. The scene may contain different UI, instantiate different enemies, having multiple players. When you setup scripts for all these objects, you need a way to manage the interactions between these objects, and the differences depending on multiple factors like scene, level, players. When you instantiate different enemies in a scene, you need a way to manage the logic behaviour for each enemy type separately, depending on difficulty level. Also, when you setup different players, you need a way to manage each character’s requirements.
With traditional game development approach, you must create separate copies of the script for each enemy, level, or scene. Or, you must create a single game that treats all aspects the same, regardless of the context. The result is games that do not scale and are hard to maintain.
GameRules’s class structure allows you to organize your rules using the same dimensions as your logic. The class structure makes reusing common logic and properties easy while allowing for differences between objects, characters, scenes, levels, and any other dimension.
Building a game on top of a well-designed class structure is vital for game scalability. A well-designed class structure also enforces best practices around reuse and standardization as the game expands to other features.
Class Structure layers
For each release of GameRules, the generated class structure reflects best practices available in that release.
GameRules Core
The GameRules Core layer contains the built-in assets necessary for generatings scripts and to accelerate development. This layer should always be part of the class hierarchy
Implementation layer
The Implementation layer contains the assets created by your team to actually build your game.
Note
At any time, an additional layer can be added, and the class hierarchy of the implementation layer can be adjusted as needed.
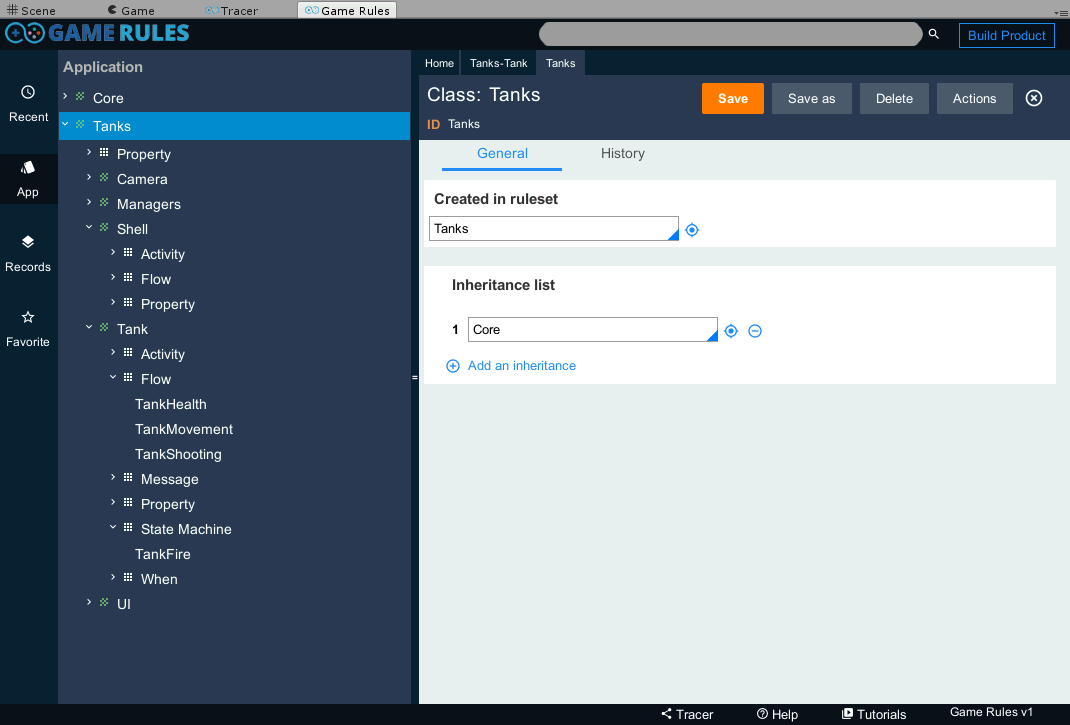
Example of Class Structure
This example has been created based on Tanks tutorial available at Unity website.
In this example, we have followed same class structure than tutorial script’s folders. For a more complete game, one can extend that class structure with subclasses for Shell and Tank for example, to specialize rules by tank model and shell type (e.g. Tanks-Tank-Panzer and Tanks-Shell-Fire).
Tanks root class of the implementation layer inherits from Core class.
In this example, all subclasses of Tanks (Tanks-Shell, Tanks-UI, …) have same inheritance list than Tanks class.
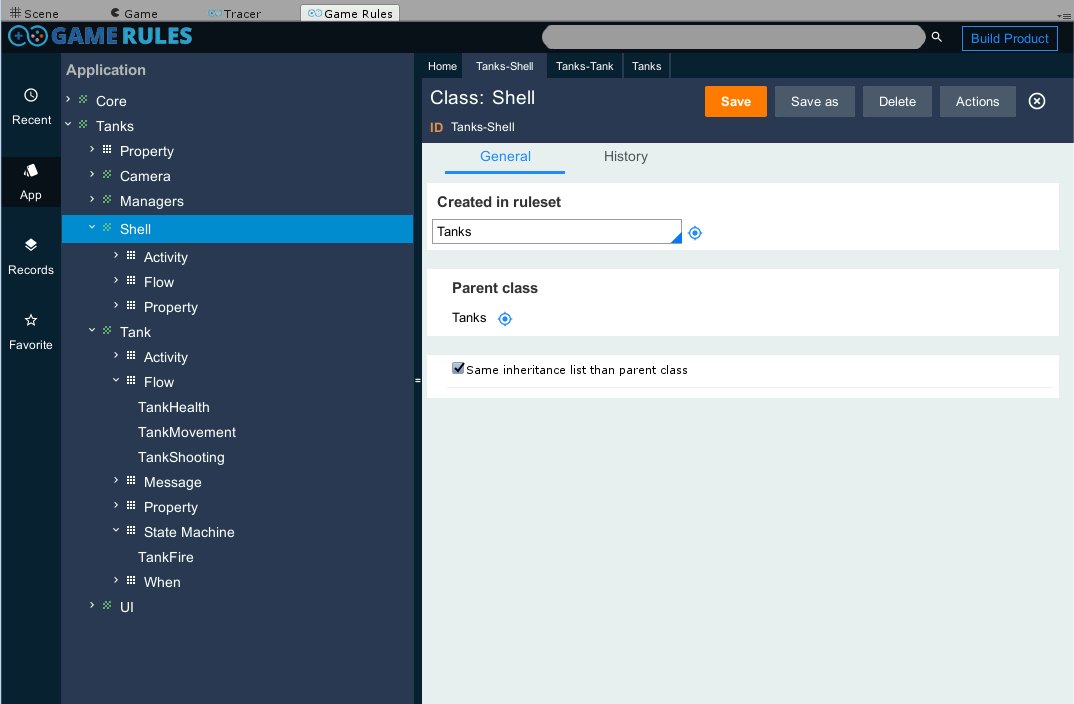
As classes are using double inheritance (pattern and direct), the resulting inheritance is for a class like Tanks-Shell-Fire would be:
- Tanks-Shell-Fire
- Tanks-Shell
- Tanks
- Core
Creating a new class
To create a new class, the simplest way is to right-click on existing class from navigation area, and to select + Class option.
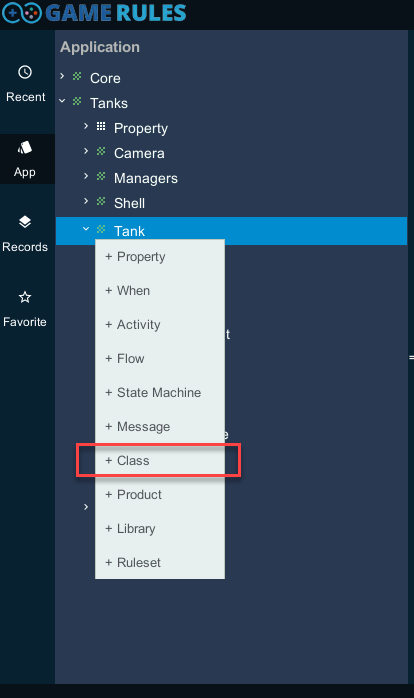
In the new class form, specify the full path of your class (e.g. Tanks-Tank-Panzer) and then click on Create and open:
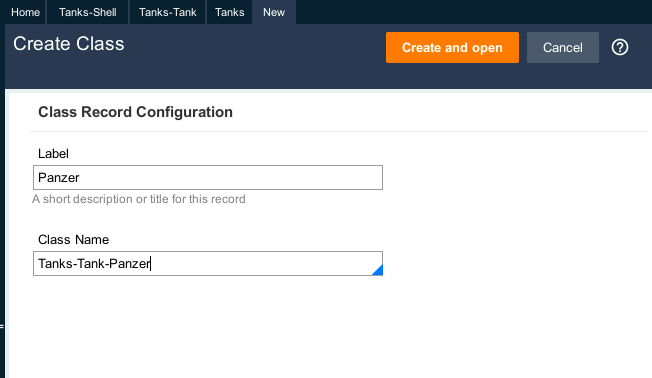
Resulting class is:
Message Rules
Message rules represents main function and methods that are generated in scripts. Inherited functions from MonoBehaviour (Awake, Start, Update, …) and StateMachineBehaviour are all provided in GameRules Core layer. They are assembled as main functions in generated scripts and called from start shapes for flows and from states and connectors for state machines.
Additional messages, specific to the game, can be added. New message rules can be:
- Public Function: if a script needs to give a public visibility and trigger to some logic, use this kind of message. A public function can return a value instead of void. From other scripts, through logic rule, the public function can be called through Call-Flow step method.
- GameRules Action: an action is message which is published and subscribed by other scripts. It is a way to de-couple one event from different reactions. From a flow or a state machine, to raise an action event, just call through a logic the step method Call-Action. From another flow or state machine, just use the action message in a start shape to subscribe to this action event. Rule assembly automatically generates subscription methods in OnEnable and OnDisable.
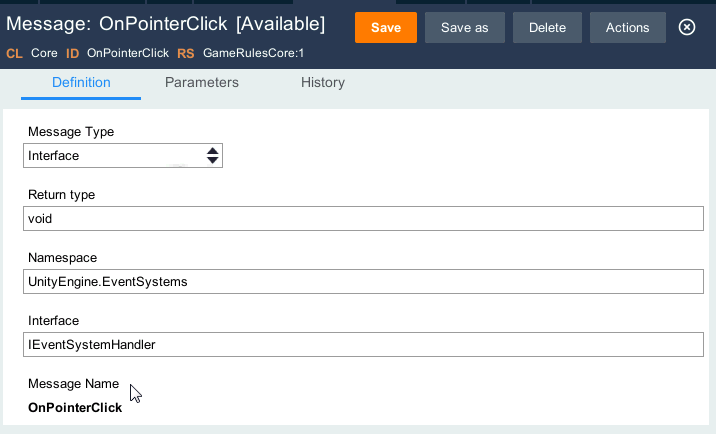
- Interface: some interface like OnPointerClick for Unity GUI are functions that need also the scripts to indicate that it implements this interface. This message type rule let developers implement interfaces. All Unity interface messages are already available in GameRules Core layer. Interfaces from additional asset extensions can also be defined.
- Third Party Action: additional libraries from Unity assets also implements action events like iTouch. This message rule type let developers easily subscribe to these actions.
Flow Rules
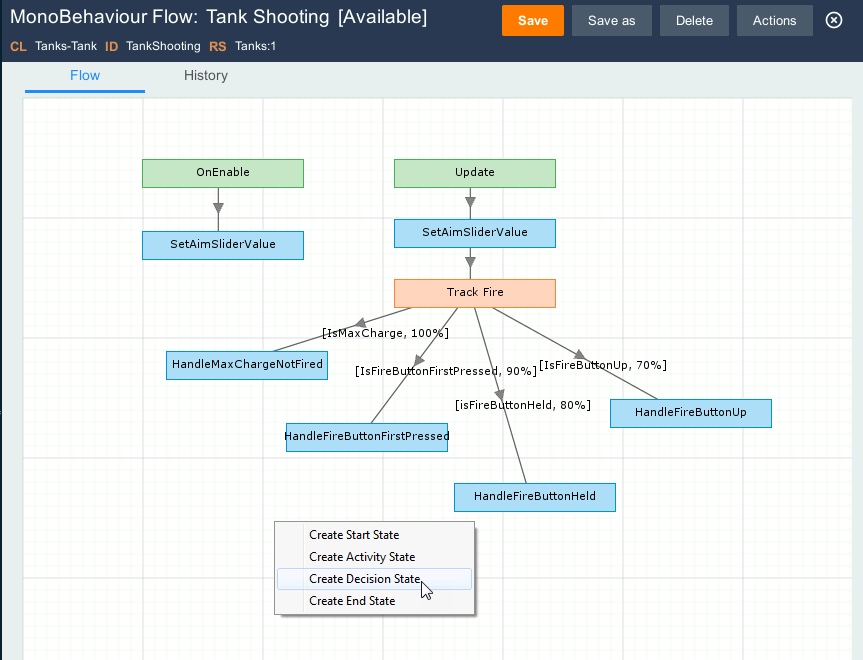
A flow rule provides a visual method for modeling a MonoBehaviour script in your game using shapes and connectors to define a sequence of events.
Each step is represented by a flow shape. A flow shape represents a task that is accomplished as part of the script logic. Flow shapes are differentiated by color, symbol, and name.
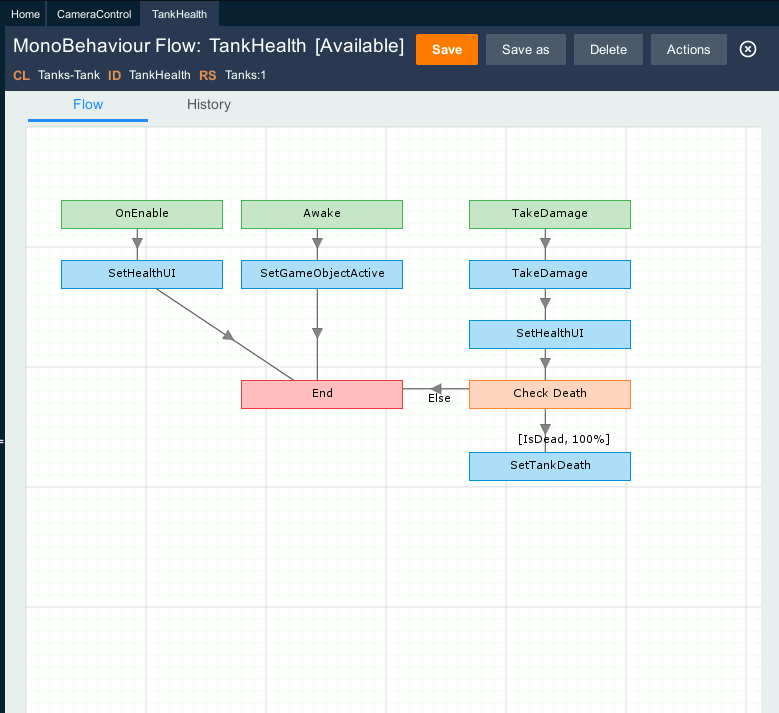
Flow rules are built using standard flow shapes.
| Shape | Meaning |
|---|---|
|
The message shape indicates the beginning of flow processing. Each message shape generates a method, and consecutive logic shapes and decision shapes are executed inside this method. Common message shapes are Start, Update, FixedUpdate, … coming from Monobehaviour. |

|
Logic shapes call a piece of code and logic through a call to a logic rule. e.g. SetHealthUI |
|
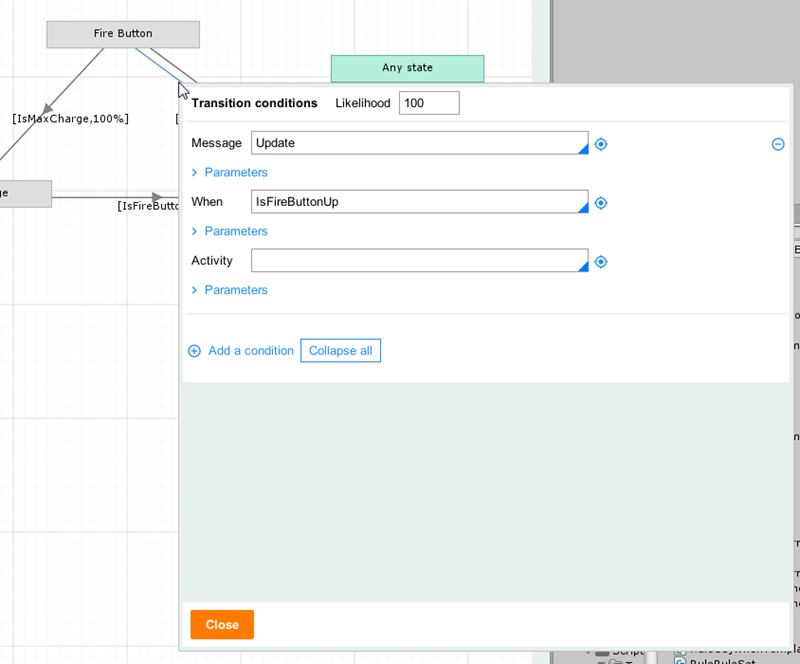
Decision shapes initiate conditional branches. Each outgoing connector calls a when rule to determine the path to take. The percentage indicates the order to evaluate different conditions. |
|
End shapes are optional. For messages returning a value instead of void, the return shape indicates the value or property to return. |

|
Connector shapes are configured for decision shapes to indicate the when rule to evaluate. |
To add a shape to flow rules, right click on flow canvas and select the shape type to add:
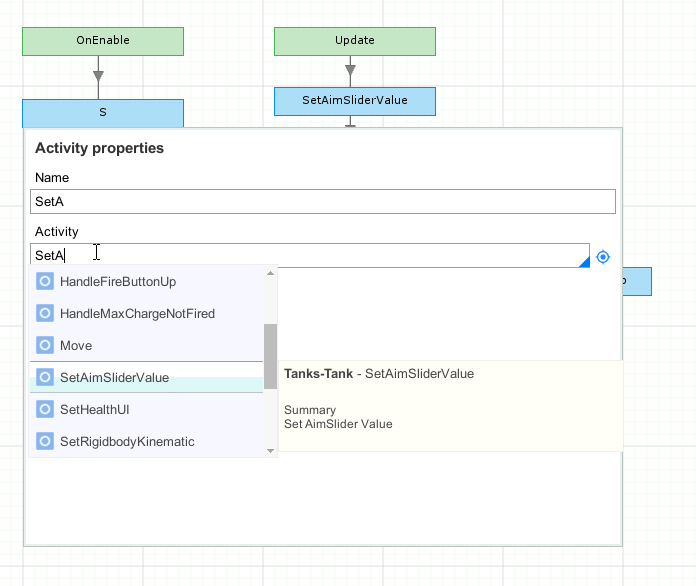
To configure a shape or a connector, double-click on it and select appropriate rule using code completion modal:
State Machine Rules
State machine rules, like flow rules, provide a visual method for modeling a Monobehaviour script. Unlike flow rules which follow a traditional approach of script programming based on logics (through logic shapes and decision shapes) embedded inside each message call (Awake, Start, Update, FixedUpdate, OnGUI, …), a state machine manages finite states for the gameObject. Each state is associated with message and logic rules to determine state processing. Each connector is associated with message and when rules to determine state change conditions.
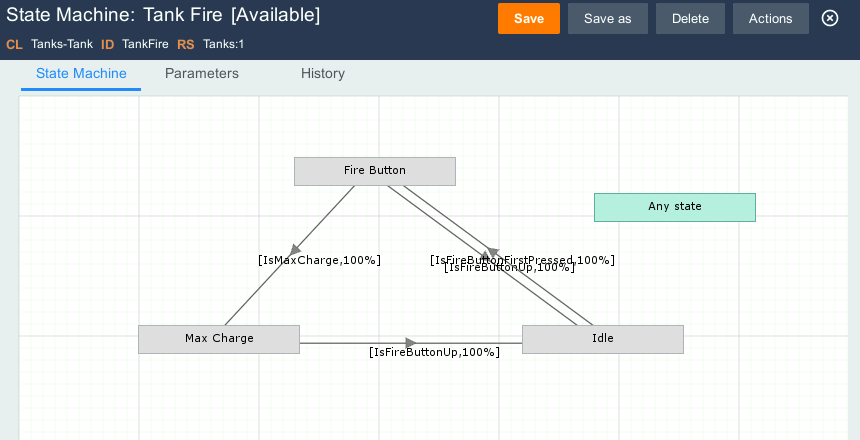
State machine rules are highly configurable to provide maximum flexibility to meet game logic, and provides a visual overview of different states and conditions:

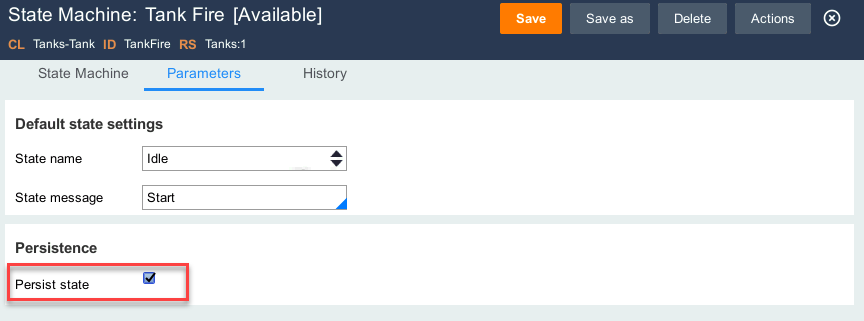
Automatic persistence of the state is also possible in a click:
Property Rules
Property rules represents global variables generated for flows and state machines and used extensively by logic and when rules. Each property defines class and name of the variable, and also how to initialize it. Like all other rules, property rules are reusable in the overall game application, giving developers and artists a unified way to declare these variables.
During product build and rule assembly, property rules are generated automatically when used by other rules (flow, state machine, logic, when), ensuring that only used properties are part of the script and are always correctly setup.
The initialization code and message automatically generate correct code in script, to accelerate and make development more robust:
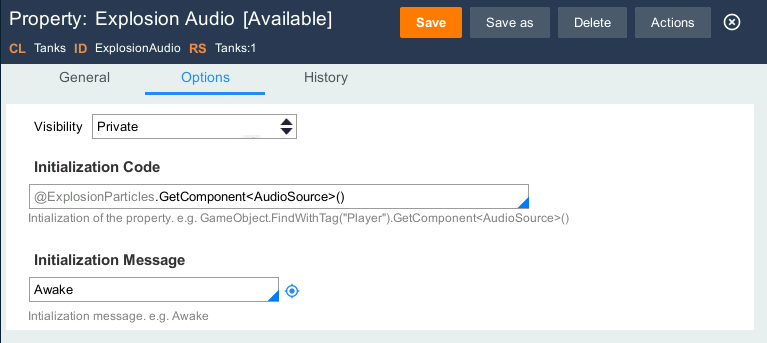
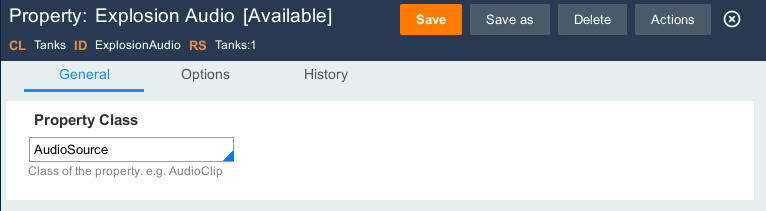
In this example, the property ExplosionAudio is referencing the other property rule ExplosionParticles (by using prefix @). The rule assembly automatically initializes first ExplosionParticles and then ExplosionAudio. Recursively, ExplosionParticles property is referencing ExplosionPrefab property:
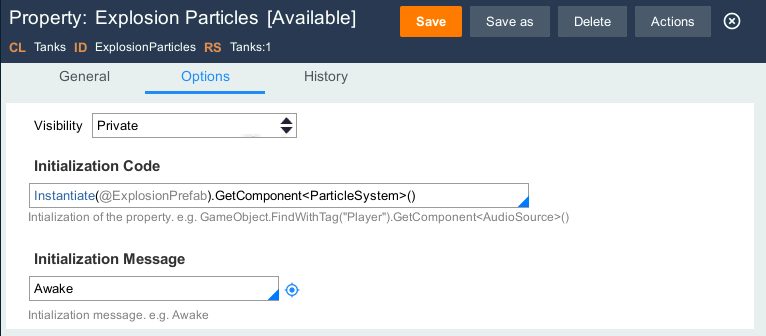
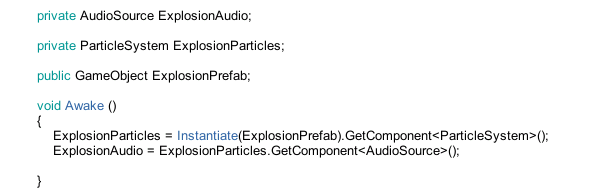
By just referencing initial ExplosionAudio property, the script will automatically contain all 3 variables with their specified initialization code:
Logic Rules
During flow or state machine processing, a game object often needs to perform specific logic. For example, firing a shell requires multiple operations to be carried out in sequence as one single step. The sequence can include instantiating a shell prefab, setting its velocity and playing the shooting audio clip. In GameRules, you implement this kind of procedural logic in the form of logics. This form is similar to conventional programming language.
Logics are the primary processing rules in GameRules. A logic is an automated procedure, structured as a series of steps that execute in sequence. Each step can call a method, transfer control to another logic, execute custom C# code or send message to other game objects.
A Method is an operation that can be performed by one step of a logic. A method contains a predefined set of basic operations that perform computations, update properties or call any C# code. Available methods are:
- Property-Set: set the value of one or more properties.
- CSharp-Method: execute a single C# expression.
- Call-Logic: execute another logic rule.
- Call-Action: send an action message, all game object listening to this action will be raised.
- Call-Flow: call a public function defined in a flow for a specified game object.
- C-Sharp: execute custom C# code.
- Log-Message: log a debug message in Unity console.
- Exit-Logic: ends current logic execution (return).
- Yield: only available for Coroutine logics, return a yield statement to pause current execution.

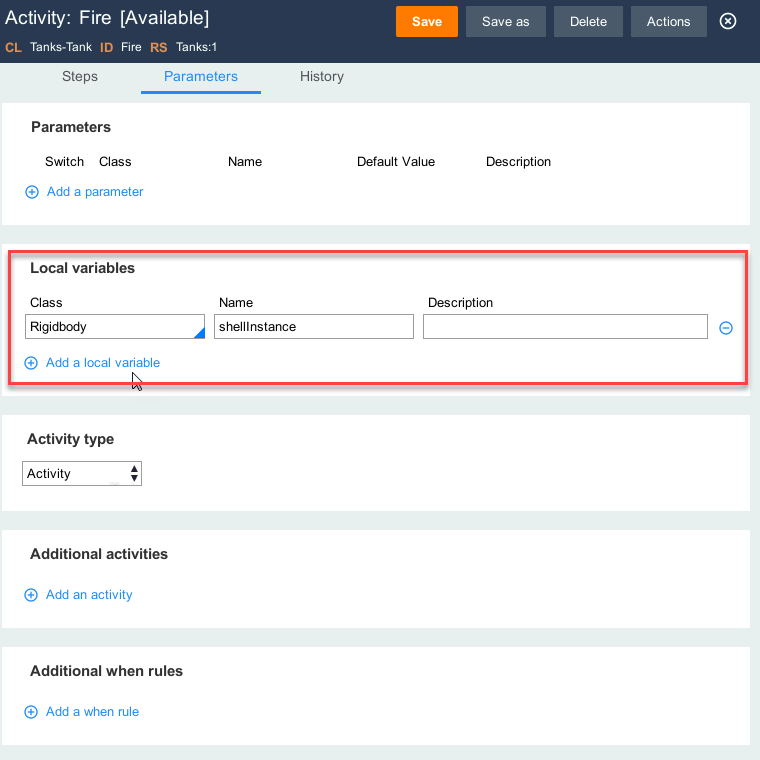
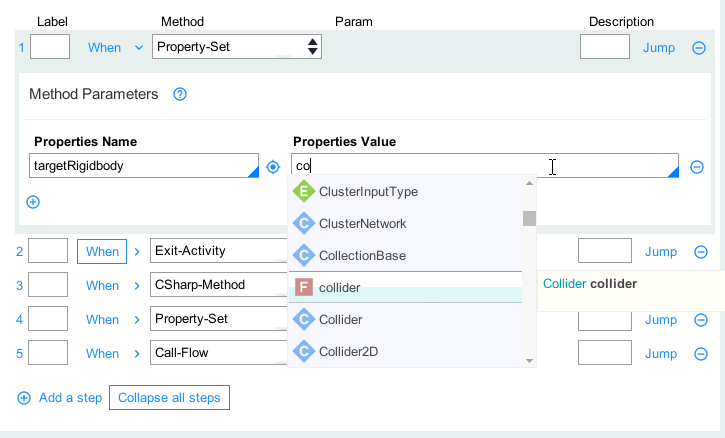
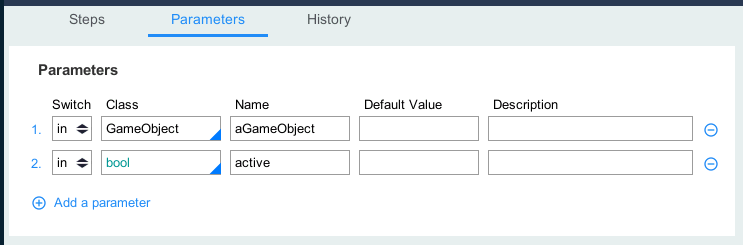
To reference property rule, we have to use the @ keyword (e.g. @FireClip). Logic rule can also use local variables, only visible for this logic, and specified in Parameters tab:
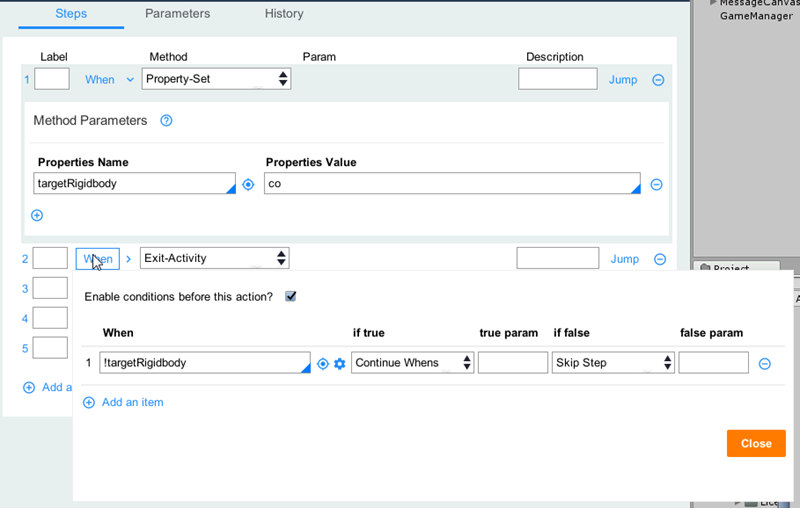
Each step can be executed conditionally, based on when rule:
Each logic is assembled as a private function with name void perform_LogicName() (e.g void perform_Fire()). When selecting Coroutine logic type, the resulting funtion will be IEnumerator perform_LogicName().
To facilitate C# development, code completion is working the same way than in MonoDevelop, showing either C# code, or property rule list when using prefix @ or when rule list for when or jump conditions:
Logics may have parameters that can be accepted as inputs, used to convey results, or serve as both inputs and outputs. Not every logic has a parameter. Parameters allow the execution of a logic to vary at run time, which promotes reuse. For example, GameRules provides a parameterized logic for inactivating a game object, named ActivateGameObject. This logic accepts the gameObject and the active boolean as parameters. Without the use of a parameter, GameRules would need a logic for each gameObjects and to set active or inactive.
When Rules
Games often need to decide whether to perform an action, such as skipping a scene load when there is no winner. For each decision, the game logic tests a condition to return a true or false result. If the result is true, the game logic performs the conditional action. If the result is false, the game logic skips the action.
In GameRules, a when condition describes a decision that returns a true or false result. You use a when condition to compare the value of one property against a constant or the value of another property. For example, use a when condition to determine whether the tank is moving or not. If true, the tank can then play a moving engine audio. You can use when conditions whenever a game logic requires a true/false outcome. Use when conditions in flows, state machines, and logics to adjust rule behaviour.
In flows, use a when condition to branch a flow following a decision shape:

In state machines, use when rule to determine conditions to move from one state to another one:
In logic, use when rule to determine step execution:
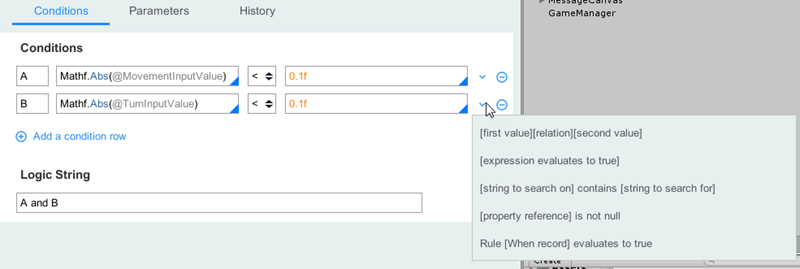
A when rule organizes a set of one or more true/false tests into a tree-like structure. Each node on the tree represents either a single condition or a group of conditions related with a Boolean AND or OR operator. The entire conditions tree reduces to a single Boolean operation. The result of this operation is the result of the when rule. Use the Conditions tab to enter or revise the conditions tree for a when rule. The when condition is expressed as either a single boolean expression or a tree consisting of multiple expressions combined using boolean AND or OR operators. Each expression defines a single comparison that evaluates to true or false. The when rule evaluates to true only if the entire tree of conditions evaluates to true.
Each expression can have different patterns like:
- [first value][relation][second value]: compares two values.
- [expression avaluates to true]: free-form C# expression.
- [string to search on] contains [string to search for]: uses .Contains method on strings.
- [property reference] is not null: check if property is null or not.
- Rule [When record] evaluates to true: calls another when rule.
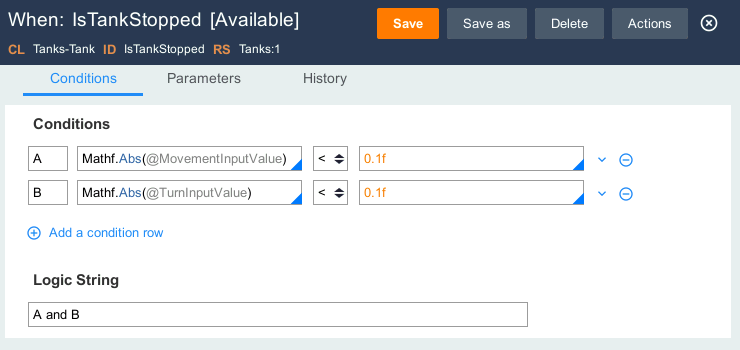
In the following example, the when rule returns a result of true if both MovementInputValue and TurnInputValue float are less than 0.1f:
Building Application
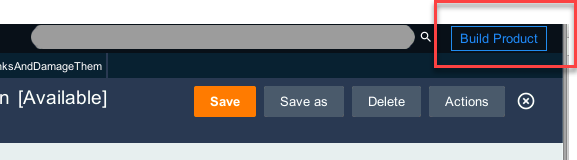
Once flow and state machines rules are created with different logics, whens and properties, it it time to generate scripts. Scripts can be regenerated as many time as wishes. To build current product, just click on Build Product button on the top bar window:
All flow and state machine rules specified in the current product rule are regenerated. The current product rule can be found in the Application rule, at the home tab:
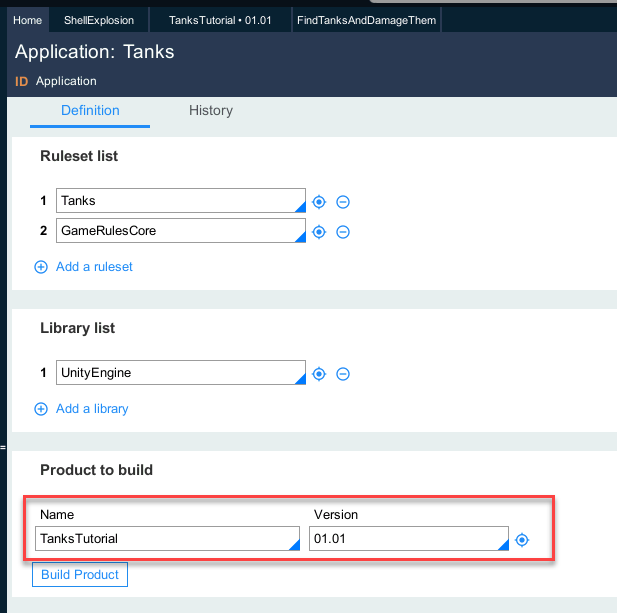
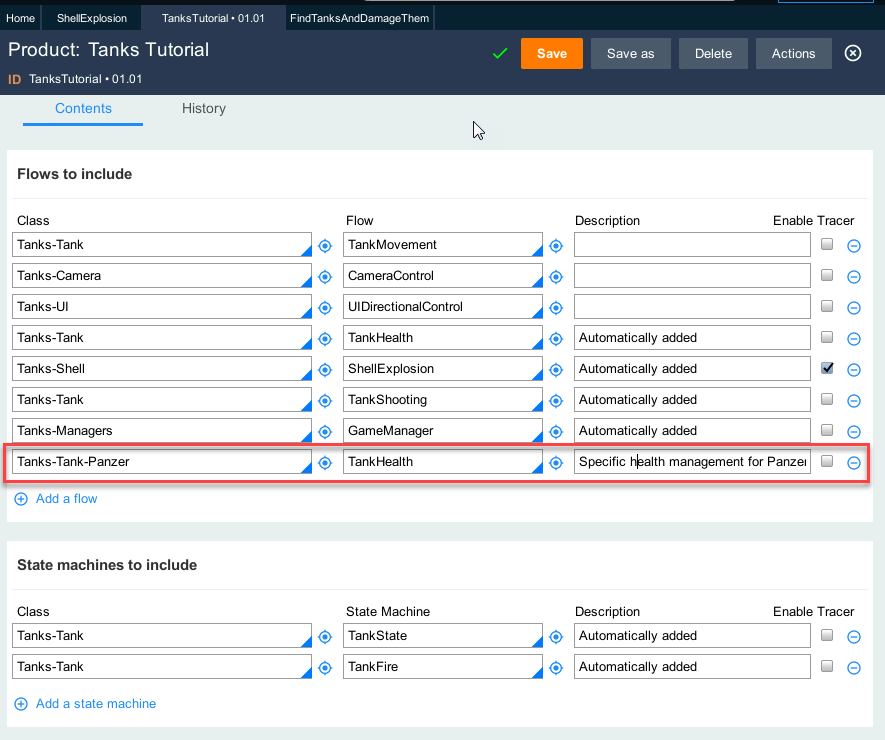
Each time a new flow or state machine is created, it is automatically added to current product rule, with same primary class than the class of the rule. Feel free to adjuts the product rule accordingly. For example, we may have to generate also an existing flow rule but for a descendant class to specialize only some rules (property, logic, …)
In that case, just add a row to the product rule flow list and setup primary class:
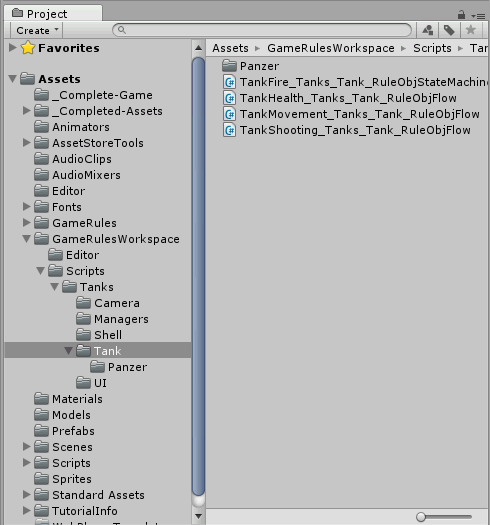
Once all scripts are generated, we can find them in /Assets/GameRulesWorkspace/Scripts folder:
Debugging Application
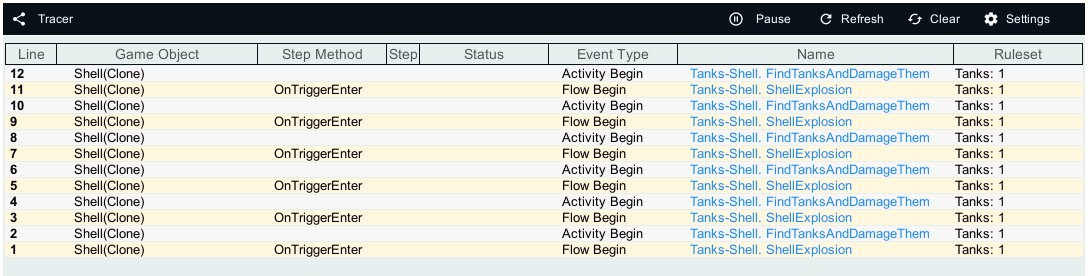
Games are rarely — if never — written free of errors. Finding problems early on and giving developers and designers the tools to find problems is instrumental to a successful development cycle. Some errors in a game are easy to diagnose. Other errors can prove difficult to identify and resolve. To help you identify and resolve errors in your games, GameRules provides the Tracer to allow you to review script execution and identify the root cause of errors.
Tracer allows you to capture and view the events that occur during flows and state machines processing. It presents a complete log of the events for all called logic and when rules. This allows you to identify the cause of execution errors.
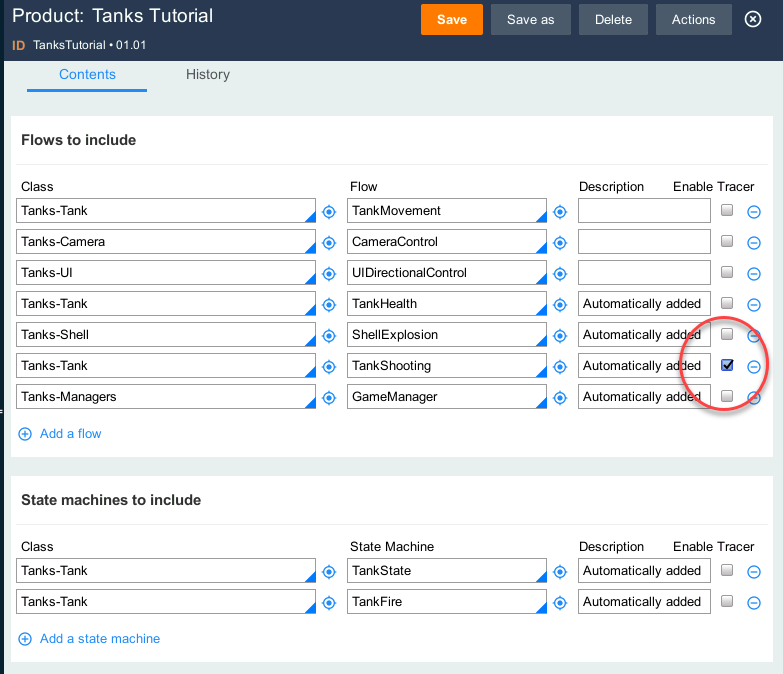
Tracer is not activated by default. To enable the Tracer, check the option in the product rule for rules we want to trace:
Once enabled and product rebuilt, the Tracer will send events to the GameRules Tracer window:
Once opened, click on Play while playing game inside Unity. The Tracer logs all of the actions and events that occur during playing session in Unity. Each event is logged in order of occurrence, and is identified by sequence, event type, and status.